When it comes to pocket-hole jigs, there’s plenty of choice but are they all the same? Having already tested jigs from several manufacturers, Jonathan Salisbury seeks to discover whether the Milescraft PocketJig400 has anything new to offer.
The Woodworker & Good Woodworking
As a joining method, pocket holes are simple and strong – if carefully positioned and glued – quick and easy to cut – with a jig, of course.
They can be located to keep them out of sight, but at corners they’re strongest when cut so that the screw points in from the end-grain, especially with thinner sections. If the holes are on view, wooden plugs can be inserted to hide them. Most people would probably consider this an undesirable feature. Unless you can find a piece of well-matched timber, you’d have to be a functional purist to appreciate them!
There are two main types of jig; the simpler and cheaper ones clamp onto the wood and the more expensive have a base with a built-in clamp into which the wood is secured. The PocketJig400 is the latter. Which you use depends somewhat on personal choice, but also which is easiest at the time. Batch producing frames is quicker when done with the clamp-type, but the basic model is convenient for one-off jobs, especially when making a repair to an existing piece of furniture.
Just type ‘pocket hole jig’ into a search engine and you’ll find many models, but they all do the same job: cutting a 9.5mm hole at 15° to a certain depth and at a certain distance from the end of the wood, depending on its thickness. The drills are all the same size, the screws are standard, too; mix and match to your heart’s content.
Unpacking
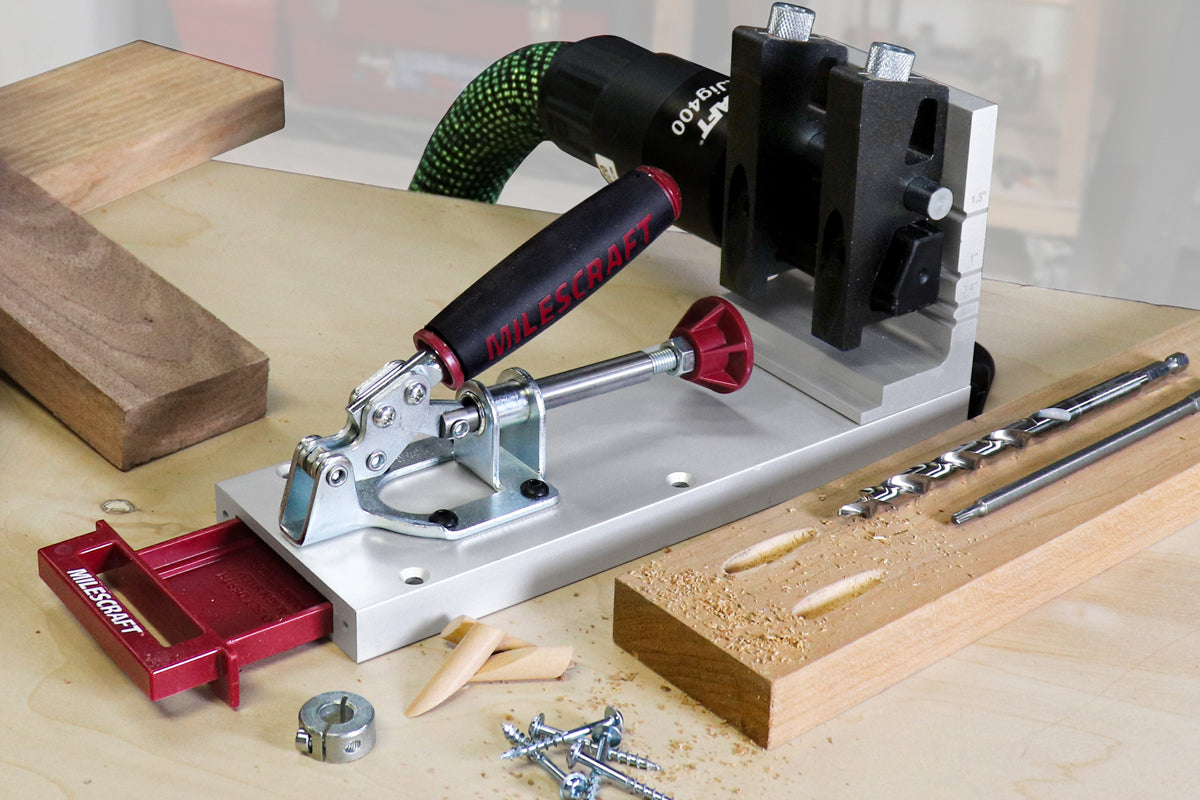
I’ve tested several Milescraft tools and they’re always well made; this jig is no exception, apart from some incomplete knurling on the replaceable steel inserts, which screw into the frame; a very small and unusual oversight on their part. The box comes with everything you need apart from a clamp. The jig itself is neatly made, mostly from anodised aluminium extrusions. The hardened steel drill guides are removable, which is often the case with better versions of this type of jig. The base has countersunk holes for attaching it to a worktop, but there’s also a bolt-on plastic clamping platform if you want
to attach it temporarily. It can be used without fixing down, but you have to hold on to it.
The base has a built-in clamp for holding the workpiece tight up to the drill guides and a drawer, with a magnet to keep it shut, for storing the functional bits and pieces once you’ve recycled the box it comes in. The accessories include a Torx driver-bit, drill, depth collar, hex key, some screws and plugs, plus a dust extraction convertor.
Setting up to drill
The angle of the holes is fixed, but the distance from the end of the wood that they’re drilled needs to be matched to its thickness. The aim is for the screws to exit the end as close to mid-thickness as possible, so taking the closest setting to the measured dimension, you simply fix the guides at the height indicated on the frame, set up the drill using the guide inside the tray, clamp the wood, and away you go.
It’s quite common for jigs to have pre-sets; this one has four, at 12, 19, 27 and 38mm; yes, the classic 1/2", 3/4", 1" and 11/2" – except that 27mm isn’t 1in, of course. This jig is particularly good, as the guides lock into grooves in the upright so they can’t
move during use. I use a lot of 2×1, which ends up planed down to about 44 × 22mm. I can set up the drill for 19mm or 27mm, but not between, so therefore have to decide between the screws coming out too high or too low.
On many jigs, the distance between drill guides is set, so if you want the holes to be closer together or further apart, you have to move the workpiece between each one. But the two independent drill guides on the PocketJig400 allow the distance between holes to be adjusted from 3/4" to 3" – 19 to 75mm.
Setting up the drill is easy using the guide moulded into the drawer. Taking the height reading from the side of the jig to match where the guides are set, the drill tip’s shoulder is placed level with the respective line, the collar slides up to the recess, then locked onto the drill’s shaft. It’s a tried and tested method that works very well.
Reading material
The ‘booklet’ of stapled sheets that’s supplied with the jig is essential reading for new users, but if you already know how to use a pocket hole jig you definitely won’t need it. There are diagrams for every step and separate text to explain these; if you’re still confused, there’s plenty of online tutorials and demonstrations. Practice makes perfect – and pocket holes aren’t difficult to cut.
In use
There are no surprises here. The adjustable clamp locks the wood firmly in place – I used a packing piece as it easily marks the surface – the drill is guided smoothly at the correct angle and the dust extraction tube removes chippings effectively. The drill removes some of the black anodised surface inside the guides the first few times it’s used; this needs to be carefully cleaned off the wood, otherwise it leaves smudges. I always forget to run the drill with scrap wood to prevent this from happening with wood that matters. There were also a few pieces of aluminium swarf, which was a little more worrying. It doesn’t seem to have affected the jig’s performance yet, though.
I’ve never used a pocket hole drill that doesn’t tear grain, so there was no surprise when the edges of the holes weren’t clean; this isn’t so obvious once the plugs are in, of course. The first 19mm test pockets seemed to be a little shallow; the plugs do go in, but the screw heads aren’t far below the surface. I eventually found that the drill guides weren’t fully inserted and needed another half turn. The resulting joints were as good as any I’ve made.
The guide block can also be removed from the base so that it can be used as a more mobile jig. The only slight issue I had with this is that a standard pocket hole clamp can’t be used when it’s placed inside an existing joint, as the recess overlaps the bottom of the jig. But if the PocketJig400 is the only jig you have, then this adaptability is a definite plus.
Conclusion
The more pocket hole jigs I test, the more I realise that there really isn’t very much difference between them. They all use standard distance settings – marked on a gauge even if they’re not indexed like the PocketJig400 – and all cut at a 15° angle. Apart from differences in their colour or the method used to turn them – square or Torx – the screws are pretty much all the same. Which jig is best therefore comes down to how easy it is to set up and use, how successfully it does its job, and how consistent the results are; and of all the jigs that I’ve tested, the PocketJig400 is among the best.
Firstly, it’s solid and uncomplicated. The four indexed settings don’t give an ‘infinite’ range, but you can always set a 12, 19, 27 or 38mm hole in exactly the same place every time; there can be no misalignment and definitely no slippage. The ability to alter the distance between holes is also very useful and a single wheel locks the guides securely in place. Clear markings on the top and sides help to ensure correct positions. The work clamp is just as effective, ensuring that the wood doesn’t move between holes, and the guide block can also be removed for getting into corners.
The storage tray is large enough to hold all supplied accessories, ready to use; that’s much better than them being loose in a bag and they’re less likely to go missing. The two drill guide bodies look smart and are, more importantly, functional; replaceable drill guides are a good idea too, although I haven’t yet checked that spares are available – and the extraction port removes the chippings so that you can cut joint after joint without having to stop to clear blockages.
A bolt-on plate means that it can be easily clamped if you don’t want to screw the jig permanently to a bench top. There’s also a burgundy coloured plate that attaches in the same place; this acts as a stop to position the jig parallel to an end, or it can be clamped in a vice to hold the jig still. If that isn’t enough, the PocketJig400 is less than half the RRP of my previous best in show. An extended test is required to be absolutely certain that, in the long run, this jig truly is better value for money, but my hunch is that it will be. It might not be the only pocket hole jig you need for every eventuality, but it’s definitely an excellent starting point.
Features
- Height adjustable bushing blocks contain two 38" steel drill guides, which can be repositioned for drilling boards from 12mm up to 38mm thick
- Drill guides adjust horizontally to position holes between 20mm and 75mm apart Removable dust extraction works with common 64mm and 27/32mm hoses
- All-steel toggle clamp with micro-adjust non-marring clamp-head dials in perfect clamping pressure for different board thicknesses
- Convenient storage drawer holds bit, driver, depth stops, and more
- L-Base can be removed from the main body and used for mobile pocket hole projects and repairs
The Verdict
- Pros: Solidly built; simple setup; consistent results; several different clamping methods; adjustable distance between holes; indexed depth settings
- Cons: Limited to four pre-set depths
- Performance Rating: 5 out of 5
- Value Rating: 5 out of 5
Click here to download the full article